Artwork Guidelines
Preparing Artwork Files
We much prefer that you send native file formats from Adobe Creative Suite. Alternatively, save your file as .pdf as an Acrobat 4.0 (.pdf 1.3) compatible file together with with crop marks and ‘High Quality’ setting which includes bleed of at least 2mm. (See below for details on bleed). There are many other programs that can be used to produce artwork but these often result in lower quality output. Please try to avoid MS Paint and PowerPoint. If you are preparing your file in Microsoft Word, please save the file as a .pdf before sending it to us. (Go to ‘Print’ and in the bottom left hand corner look for ‘Save As’ option and save as .pdf.)
If you are using Canva please see here -> https://www.canva.com/help/margins-bleed-crop-marks/
If your artwork has been prepared using any AI tools please see below for our updated guidelines.
HOW TO INCLUDE PRINT MARKS AND BLEED ON YOUR PRINT FILES
ADOBE INDESIGN or ILLUSTRATOR
- Click on File>Document Setup and set your file to have 2mm bleed. Ensure that any images extend to the edge of the red box that appears around your design.
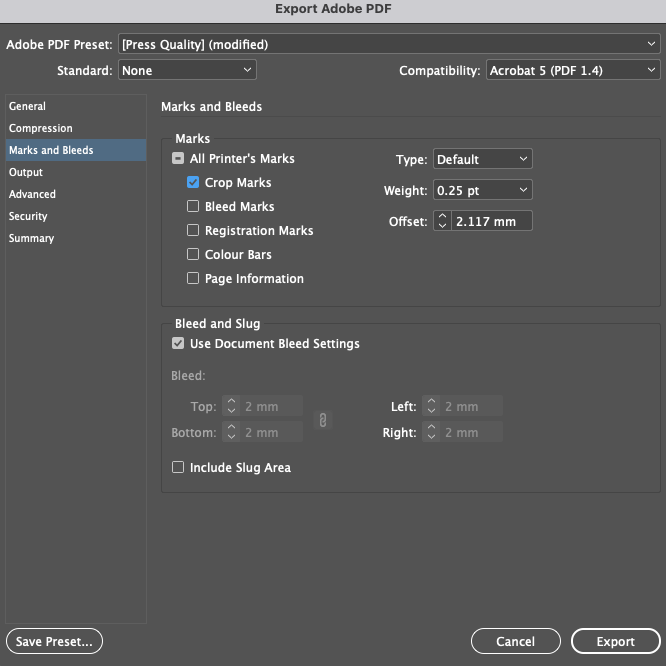
- Choose File>Export and select Adobe PDF (Print) then Save (OR Select the Adobe PDF preset Press Quality) then Save.
- Select ‘Marks and Bleeds’ (on the left of the Export Adobe box that is open, and then under ‘Marks’, make sure the Crop Marks box is ticked. Under ‘Bleed and Slug’ just below this, make sure the Use Document Bleed Settings is ticked (or your Bleed settings are 2mm in all four boxes).
- Click ‘Export’.
ADOBE PHOTOSHOP
- Make sure the image extends 2mm beyond the size you want.
- Go to “Save As.”
- Select “Photoshop PDF” from the drop-down menu.
MICROSOFT WORD
- Click ‘Page Design.’
- Click ‘Size>Page Setup.
- In the Page Setup box, under Page, you have the option to select one of the page dimensions listed or customise your page size by entering your own width and height so your file is 2mm larger on each side. A4 becomes 301mm x 214mm for example).
- Go to File>Print>Advanced Output Settings.
Beware of colour shift.
Colours tend to look more purple when printing from Microsoft products.
.jpg, .jpeg, .png and other images downloaded from the internet (other than from photo libraries such as Shutterstock) should be avoided if you want good results. For most jobs we require at least 2mm bleed and we suggest keeping text at least 5mm away from the edges. Set up text as 100% Black. Large differences in printer and monitor calibration make it very difficult to accurately match colour from a monitor to print. What you see on screen may be different to the printed product. If your print job is colour sensitive, request a printed proof first.
Layout
Please supply your job 1up, not as multiples on a sheet. Our imposition software makes the most efficient use of the sheet size and ensures that the jobs are in the correct place for trimming and accurate finishing. When preparing a booklet, book or brochure, please leave your pages in order. Don’t try to impose them. Please always specify the final product size as well as the flat sheet size.
AI GENERATED ARTWORK
Using AI-generated artwork for printing requires careful preparation because most AI models output images at 72 DPI (dots per inch), which is suitable for computer screens but too low for high-quality printing. All printers require 300 DPI, CMYK colour profiles, and proper file formats (such as PDF, TIFF, or PNG) to ensure the final output is sharp, clear, and not pixelated.
> Please note: We generally cannot edit your artwork as it would not have been prepared using layers for us to access. <
Here are our key guidelines for preparing AI-generated artwork for print: (updated 2026)
1. Resolution & Upscaling
- Minimum Resolution: Ensure your design is at least 300 DPI at the final print size.
- Upscaling: Use AI upscaling tools to increase pixel density, as native AI output is usually too small.
- Vectorisation: For logos or simple graphics, convert AI raster images into vector formats (SVG, Illustrator .AI file, EPS) for infinite scaling without quality loss.
2. Color Mode Conversion
- RGB to CMYK: Most AI engines generate images in RGB colour space. Convert images to CMYK before submission, as printing requires a 4-colour process.
- Colour Shift: Be aware that converting from RGB to CMYK may alter colours, making them look less vibrant, so manual adjustment might be required.
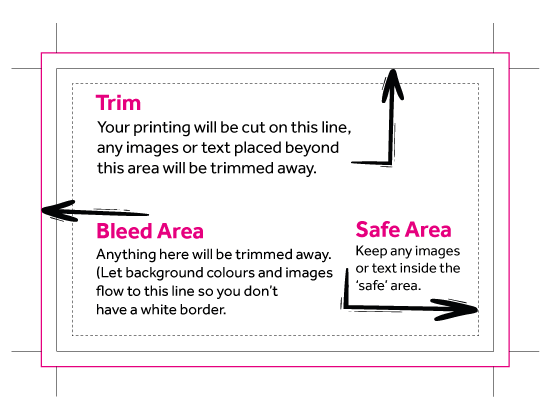
3. Bleed and Safety Margins
- Bleed: Add a minimum of 2mm bleed allowance around the entire design to ensure images fill the page after trimming.
- Safe Zone: Keep critical text and elements away from the edge to prevent them from being cut off or obscured in binding.
4. Quality Control
- Check for Artefacts: Inspect AI images closely at 100% zoom for “hallucinations,” such as extra fingers, distorted text, or unintended artefacts.
- Refinement: Do not rely solely on the raw AI output. Use Photoshop or other tools to refine edges, fix errors, and improve sharpness.
5. File Formats & Submissions
- Preferred Formats: High-resolution PDFs are generally preferred, but please ensure fonts are embedded or outlined.
- File Size: Large formats (posters, billboards) may work with lower resolution (150 DPI) if viewed from a distance, but standard print generally demands 300 DPI.
6. Legal & Ethical Considerations
- Commercial Rights: Use AI platforms that specifically allow commercial usage of generated images.
Getting Artwork Files to us for Printing
When sending files via email, please ensure that you send it at ‘original size’ as some email software reduces images to screen resolution which is too low to print from successfully. If your file is too big, please visit our secure upload page here.